
Kitchen & stock 3 min read
Menu and recipes
मेन्यू और रेसिपी
Add dishes, sizes and add-ons, mark items sold out, and know the cost of every plate.
डिश, साइज़ और ऐड-ऑन जोड़ें, आइटम सोल्ड आउट करें और हर प्लेट की लागत जानें।
What it does
Add dishes with prices, GST, sizes (Half / Full) and add-ons, in English and Hindi.
Import a whole menu from a photo or an Excel sheet.
Add recipes to see each plate's cost and food cost %, and get suggested prices.
- Who uses it
- OwnerManagerChef
- Which plan
- Every plan, including Free
- Free holds up to 50 menu items. Import from a photo is on Starter and above (and every free trial). Recipes use ingredients from Inventory, which is on Growth and above.
- Where to find it
- Sidebar → Menu & Recipes
How to
Add a dish
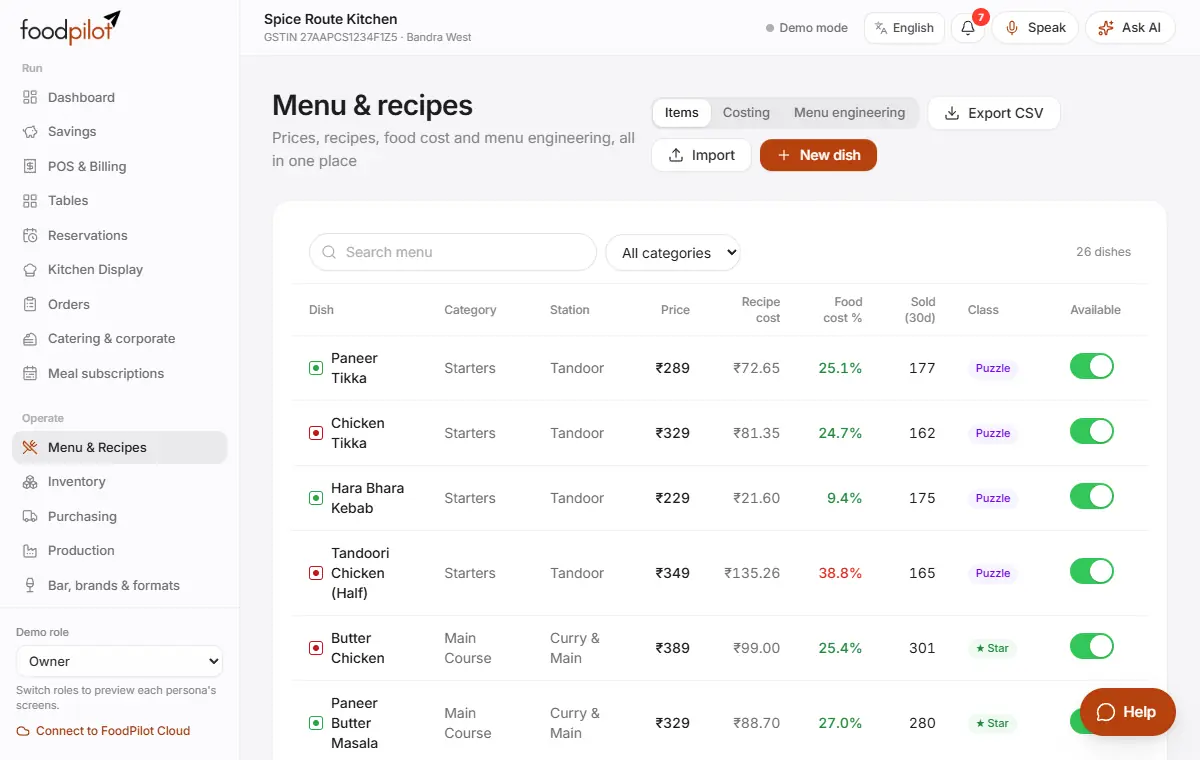
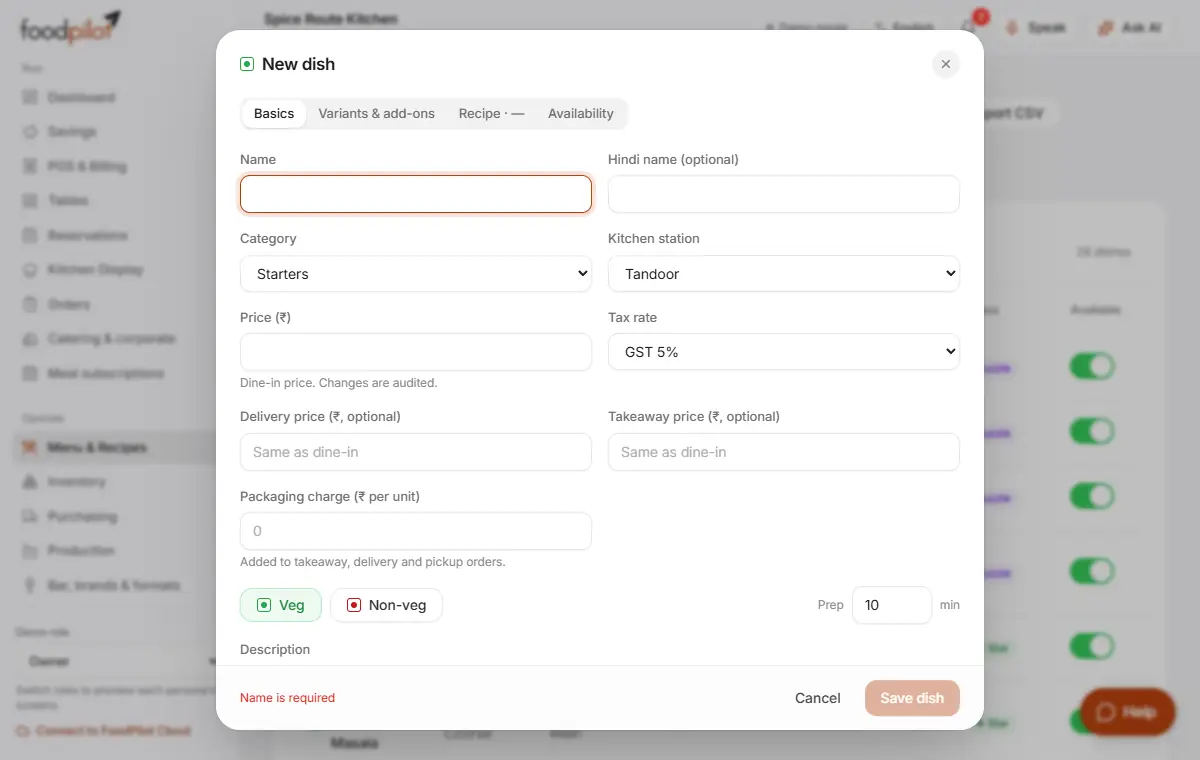
Menu & Recipes → New dish → Save dish
- Step 1: Open Menu & Recipes and tap New dish.
- Step 2: In Basics, fill in Name, Hindi name (optional), Category, Kitchen station, Price (₹) and Tax rate. Tap Veg or Non-veg.
- Step 3: Add a separate delivery or takeaway price, and a packaging charge, if you need them.
- Step 4: Tap Save dish.
Add sizes and add-ons
- Step 1: In the dish, open Variants & add-ons.
- Step 2: Under variants, tap Add for each size, for example Half ₹180 and Full ₹320. A variant replaces the base price.
- Step 3: Under add-ons, tap Add for each extra, for example Extra cheese ₹40. Add-ons are added to the price.
- Step 4: Tap Save dish.
Mark a dish sold out
- Step 1: In the Items list, turn off the Available switch on the dish.
- Step 2: It shows Sold out on the POS and disappears from your online store and table QR menus at once.
- Step 3: Turn it back on when you have it again.
- Step 4: To sell a dish only at some times (for example breakfast), open it → Availability → Only at certain times, and set From, To and the days.
Import your menu from a photo or Excel
Menu & Recipes → Import
- Step 1: Tap Import.
- Step 2: Choose From photo/PDF and take a photo of your printed menu. Or choose Paste or CSV and upload a sheet (Use sample shows the format).
- Step 3: Check the preview and fix anything wrong.
- Step 4: Tap Import N dishes.
A dish with the same name is updated, not added twice.
Add a recipe and see the plate cost
- Step 1: Open the dish → Recipe.
- Step 2: Add ingredients with quantity, unit and wastage %. Add prep items (sub-recipes) such as a gravy base.
- Step 3: The tab shows the plate cost, margin and food cost % as you type.
- Step 4: Or tap Structure recipe from notes and paste the chef's notes.
Fix dishes that cost too much
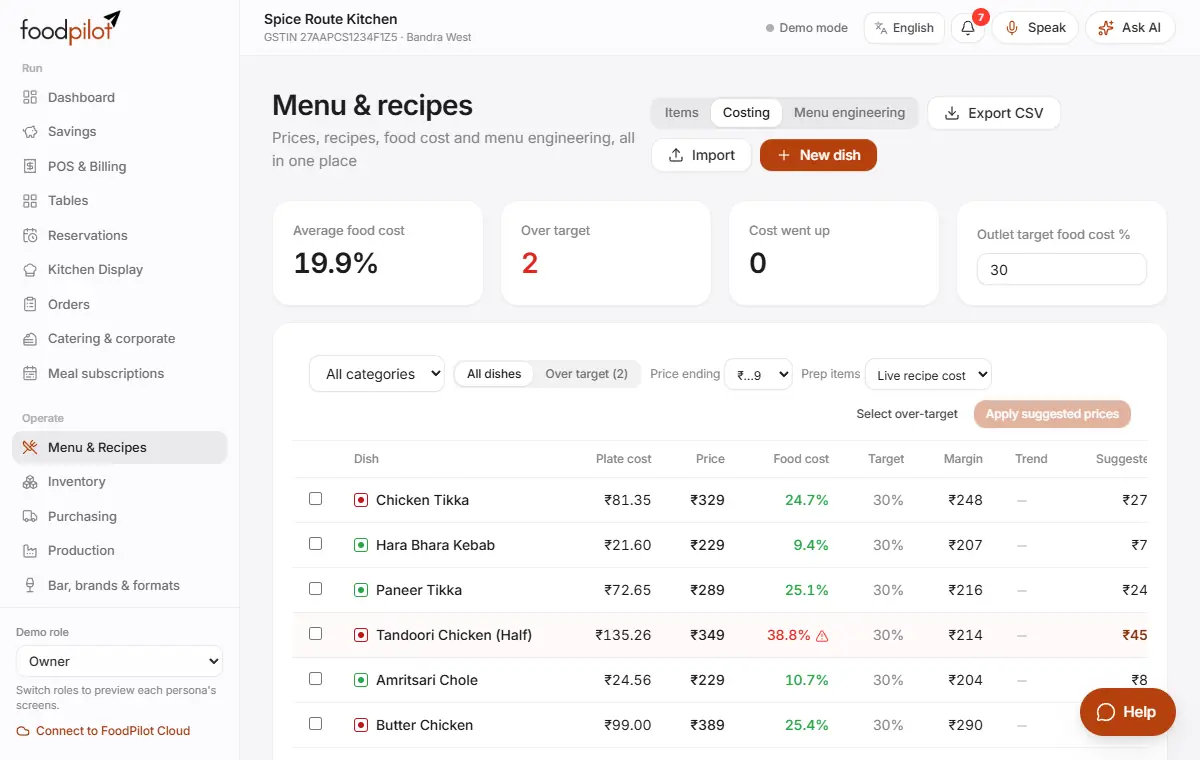
Menu & Recipes → Costing
- Step 1: Open Costing and set your Outlet target food cost %.
- Step 2: Tap Over target to see dishes above your target.
- Step 3: Tap Select over-target, check the suggested prices, and tap Apply suggested prices.
See which dishes earn the most
Menu & Recipes → Menu engineering
- Step 1: Open Menu engineering.
- Step 2: Dishes fall into four groups: Stars (popular and profitable), Plowhorses (popular, low profit), Puzzles (profitable but rarely ordered) and Dogs (neither).
- Step 3: Promote Stars, re-price Plowhorses, push Puzzles and rethink Dogs.
Tips
- Mark allergens (gluten, dairy, nuts and more) in Basics. They show on the kitchen ticket.
- Estimate nutrition & allergens gives a first draft. Always check it before guests see it.
- Tap Export CSV to keep a copy of your menu.
Common problems
- Save dish stays greyed out.
- Read the message at the bottom, for example "Pick a category" or "Pick a kitchen station". Every dish needs a name, a price, a category, a tax rate and a station.
- I can't change prices.
- Only owners and managers can change prices.
- I can't delete a dish.
- It's on an open order. Settle that order first.
- Photo import found no dishes.
- Take a sharper, straight-on photo in good light, one page at a time.
- The Recipe tab says "Add ingredients in Inventory first".
- Add your ingredients in Inventory → Add ingredient, then come back.