
Guests 2 min read

Online store and delivery

ऑनलाइन स्टोर और डिलीवरी

Your own ordering website for pickup and delivery, with no commission.

पिकअप और डिलीवरी के लिए आपकी अपनी ऑर्डर वेबसाइट, बिना कमीशन।

Updated

Whole guide as PDF

What it does

Your own online menu where guests order for pickup or delivery. Share the link on WhatsApp, Instagram or Google.

Orders land in your POS and kitchen, and guests follow the live status.

You set delivery areas, fees and minimum orders. No aggregator commission.

Who uses it
OwnerManagerCashierGuest
Which plan
Every plan
The store is set up from Orders, which every plan includes.
Where to find it
Orders → Delivery zones, and Customise → Branding & store
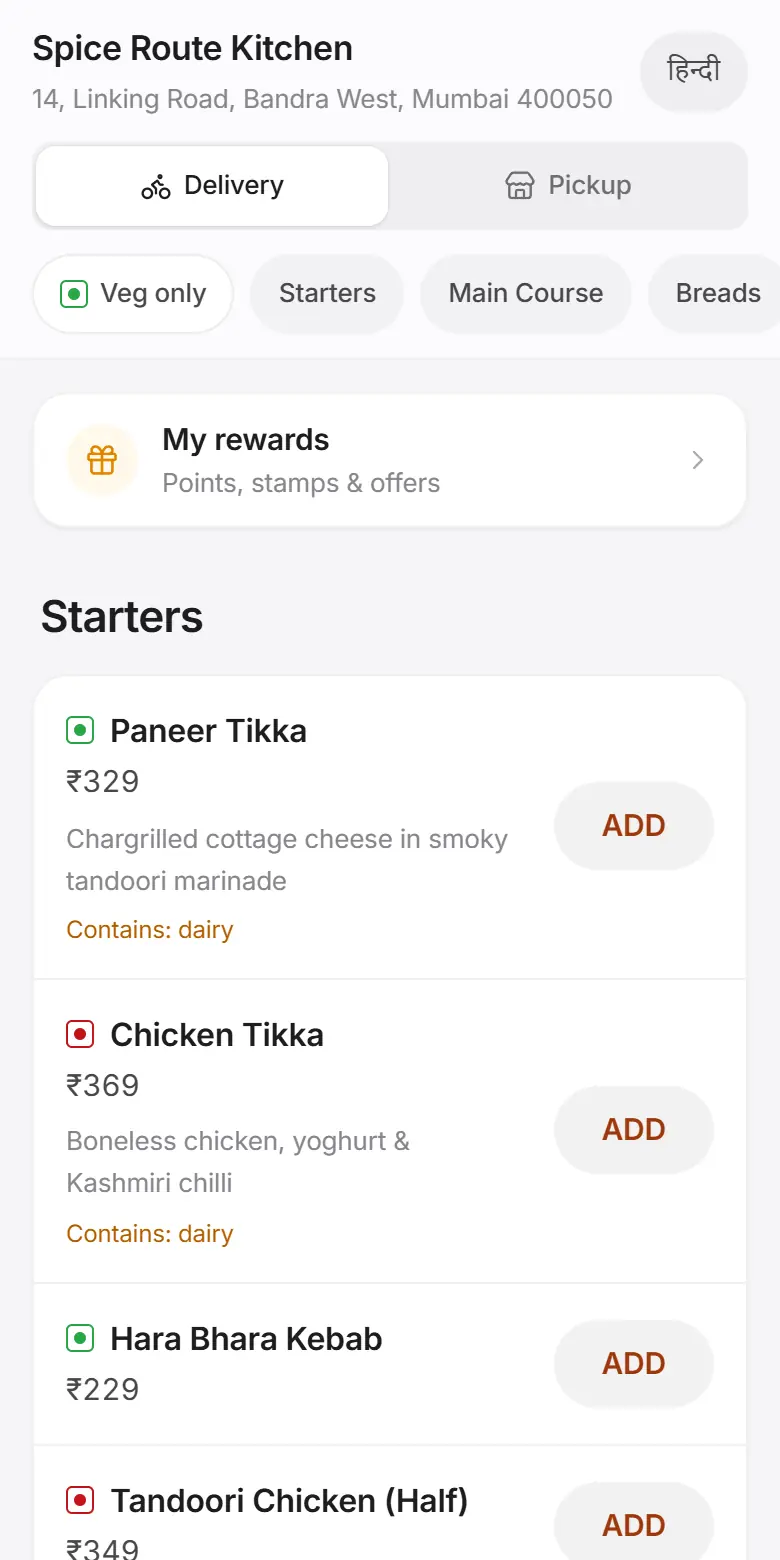
The online store on a phone with Delivery and Pickup, Veg only and dishes to add

How to

Orders → Delivery board → Online store

  1. Step 1: Open Orders, then the Delivery board or Delivery zones tab.
  2. Step 2: Tap Online store to open your store. Copy the address and share it.
  3. Step 3: Or go to Customise → Branding & store → Open online store.

Set delivery areas and fees

Orders → Delivery zones → Add zone → Save

  1. Step 1: Open Orders → Delivery zones and tap Add zone.
  2. Step 2: Fill in the name, radius (km), delivery time (min), fee (₹) and minimum order (₹). Add pincodes if you like.
  3. Step 3: Keep Accepting orders on and tap Save.

With no zones, the store takes pickup orders only.

What the guest does

  1. Step 1: Opens your link and picks Delivery or Pickup.
  2. Step 2: Adds dishes and taps Checkout. Enters name, phone and, for delivery, the area and address. Can add a promo or referral code.
  3. Step 3: Taps Place order and follows the status: Order received → Preparing → Ready → Out for delivery → Completed.

Handle online orders

  1. Step 1: New online orders show in Orders and on the POS, and go to the kitchen like any other order.
  2. Step 2: Use Orders → Delivery board to follow delivery orders and riders.

Add your logo and colours

Customise → Branding & store

  1. Step 1: Open Customise → Branding & store.
  2. Step 2: Add your logo and brand colour. The store and the app use them.

Tips

  • Turning off Available to order on a dish hides it from the store at once.
  • Fees and minimum orders are checked by FoodPilot when the guest places the order.
  • Guests see their points and rewards under My rewards on the store.
  • Running virtual brands? Each brand gets its own storefront. See Catering, bar, central kitchen and more.

Common problems

Guests only see Pickup.
Add at least one delivery zone with Accepting orders on.
A guest sees "Couldn't place the order".
The guest needs internet. Check that the dishes are still available and that the order meets the area's minimum.
Online orders don't reach the counter.
Your devices need internet and a FoodPilot Cloud sign-in to receive online orders.

Coming soon

  • Swiggy, Zomato and ONDC orders in the same POS (waiting for partner approval)
  • One-tap reorder link for regular guests

Read next

Help articles

The same articles the AI help chat uses. In the app: Help & support → Help articles.

Online store and QR table orderingऑनलाइन स्टोर और QR ऑर्डरिंगRead

How guests order from your own online store, or by scanning a QR code at their table.

QR ordering at the table

  1. Add your tables in Setup → Tables & floor.
  2. Go to Tables, tap a table and tap Open guest QR menu for that table. This opens the table's own ordering page. Share or print that page's address as the QR code for the table.
  3. Guests see the menu with GST included and tap Place order. Nothing is paid at this point.
  4. What happens next depends on Table QR orders in Devices & printers → Payments → Table QR: orders, bill & pay:
    • Need staff approval (the default for new restaurants): the order waits for the cashier or the waiter serving that table. The guest sees "Waiting for staff to confirm". Nothing reaches the kitchen or the bill until a staff member approves it.
    • Send straight to kitchen: the order goes to the kitchen at once and the guest sees "Order sent to the kitchen!". Restaurants that used QR ordering before this setting keep this until they change it.

Approving QR orders

  1. A new QR order chimes on the POS and tables screens, shows N QR orders to approve, and puts a Waiting for approval badge on the table. The cashier, manager, owner and the table's waiter (all waiters if the table has none) also get a phone alert.
  2. Tap it to open the list. For each order:
    • Approve sends it to the kitchen like Send KOT: the KOT prints on the device that approved it and the Kitchen Display shows it.
    • Edit lets you change quantities or remove an item, then Approve changes.
    • Reject asks for a reason, such as "Item not available right now". The guest sees "Not accepted" with your reason.
  3. Who can approve: the cashier, a manager or the owner for any table, and the waiter serving that table (the bill's waiter, else the table's or section's waiter in Tables). Other waiters see the order but can't approve it.
  4. Guests can order more rounds while the table's bill is open. Each round needs approval the same way, and the guest always sees the running total of what was confirmed.
  5. Every approval, edit and rejection is in the Audit log with the name of the person who did it.
  6. Approving needs the internet. If your devices are offline, the order waits and the guest keeps seeing "Waiting for staff to confirm" until you are back online. The kitchen never gets it twice.

When the guest asks for the bill

The guest can pay from their phone (when UPI or Razorpay is set up), or tap Ask for bill and choose UPI on my phone, Card — bring the card machine or Cash. You see it as, for example, "Table 4 wants the bill — card machine".

Your online store

  1. Open your store from Orders → Delivery board → Online store, or Customise → Branding & store → Open online store.
  2. Guests choose Pickup or Delivery, enter their name and phone, and place the order. They then see a status page that updates by itself as the order is prepared and ready.
  3. Store colours and logo are set in Customise → Branding & store.

Delivery zones and fees

Go to Orders → Delivery zones → Add zone. Set the name, radius (km), ETA, fee, minimum order and optional pincodes, and tick Accepting orders. Fees and minimums are checked by FoodPilot when the order is placed. With no zones, the store offers pickup only.

Handling online orders

Online orders appear in Orders and on the Delivery board, and reach the kitchen like any other order.

Good to know

  • Your real store and table links work once you're signed in to FoodPilot Cloud; the restaurant's devices need internet to receive these orders.
  • Swiggy, Zomato and ONDC order sync isn't available yet. It needs partner approval from those platforms.