Sell 5 min read

POS and billing

POS और बिलिंग

Take orders, send KOTs, collect payment and print or send GST bills, even offline.

ऑर्डर लें, KOT भेजें, भुगतान लें और GST बिल प्रिंट करें या भेजें, इंटरनेट के बिना भी।

Updated

Whole guide as PDF

What it does

Take dine-in, takeaway and delivery orders by tapping, searching, typing or speaking.

Send KOTs to the kitchen, take cash, UPI, card or split payments, and print or send a GST bill.

It works without internet. Bills sync when you're back online.

Who uses it
CashierCaptainManagerOwner
Which plan
Every plan, including Free
KOTs to the kitchen and courses are on Starter and above. On Free, add dishes, tap Pay and Settle; the KOT button shows an upgrade note.
Where to find it
Sidebar → POS & Billing
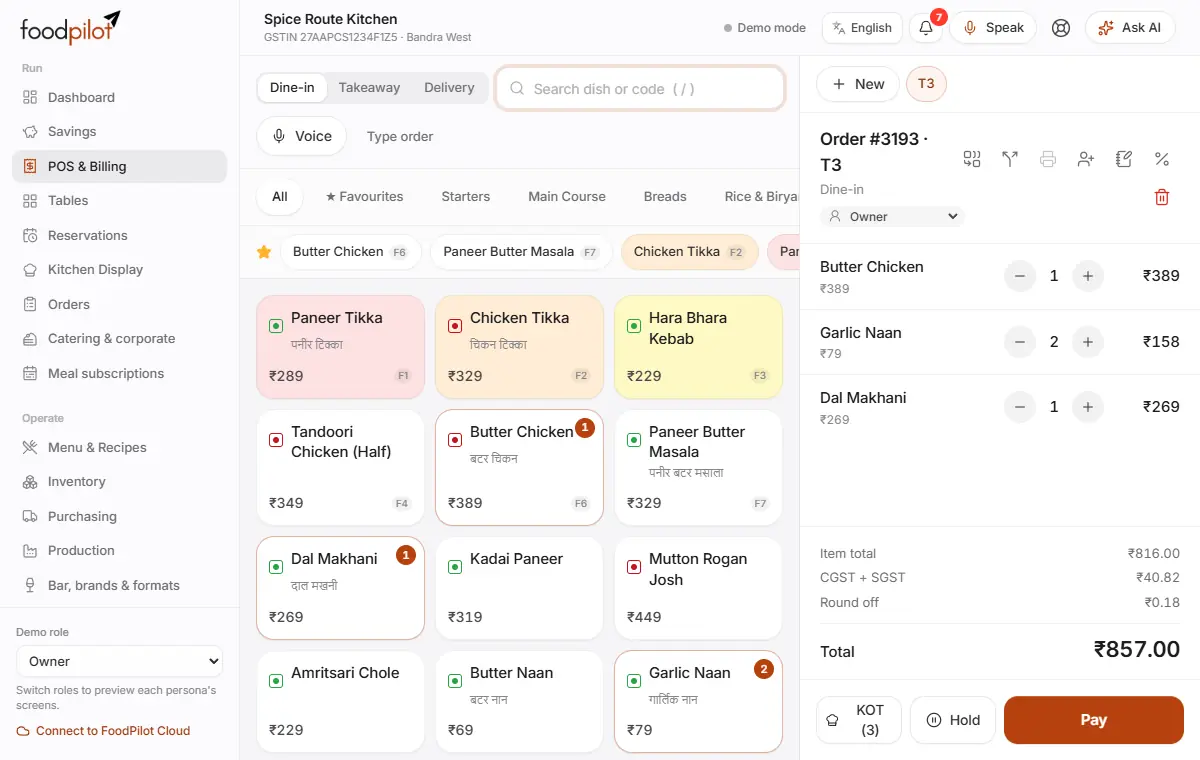
The POS with a dine-in order for table T3: dishes on the left, the ticket with KOT, Hold and Pay on the right

How to

Make a bill

POS & Billing → tap dishes → KOT → Pay → Settle

  1. Step 1: Open POS & Billing.
  2. Step 2: Choose Dine-in, Takeaway or Delivery. For dine-in, pick the table, or tap a free table in Tables.
  3. Step 3: Tap dishes to add them. Or type in Search dish or code and press Enter to add the first match. On a keyboard, press / to jump to search.
  4. Step 4: Tap KOT to send the new items to the kitchen.
  5. Step 5: When the guest is ready, tap Pay.
  6. Step 6: Choose Cash, UPI, Card or another way to pay. Then tap Settle. The button shows the amount and the way to pay, for example Settle ₹574 · Cash.
  7. Step 7: The invoice opens. Tap Print, Send e-bill or Done.
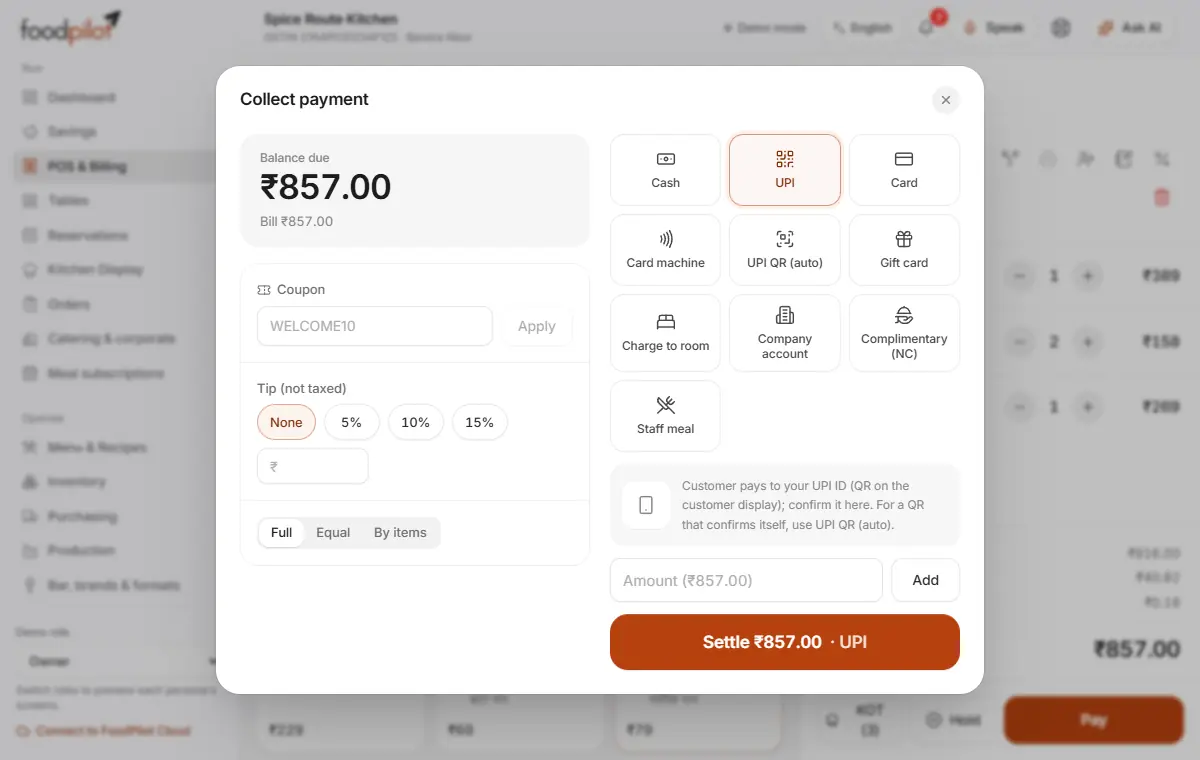
The Collect payment sheet with Full, Equal and By items, ways to pay, and the Settle button

Choose a size or add-ons

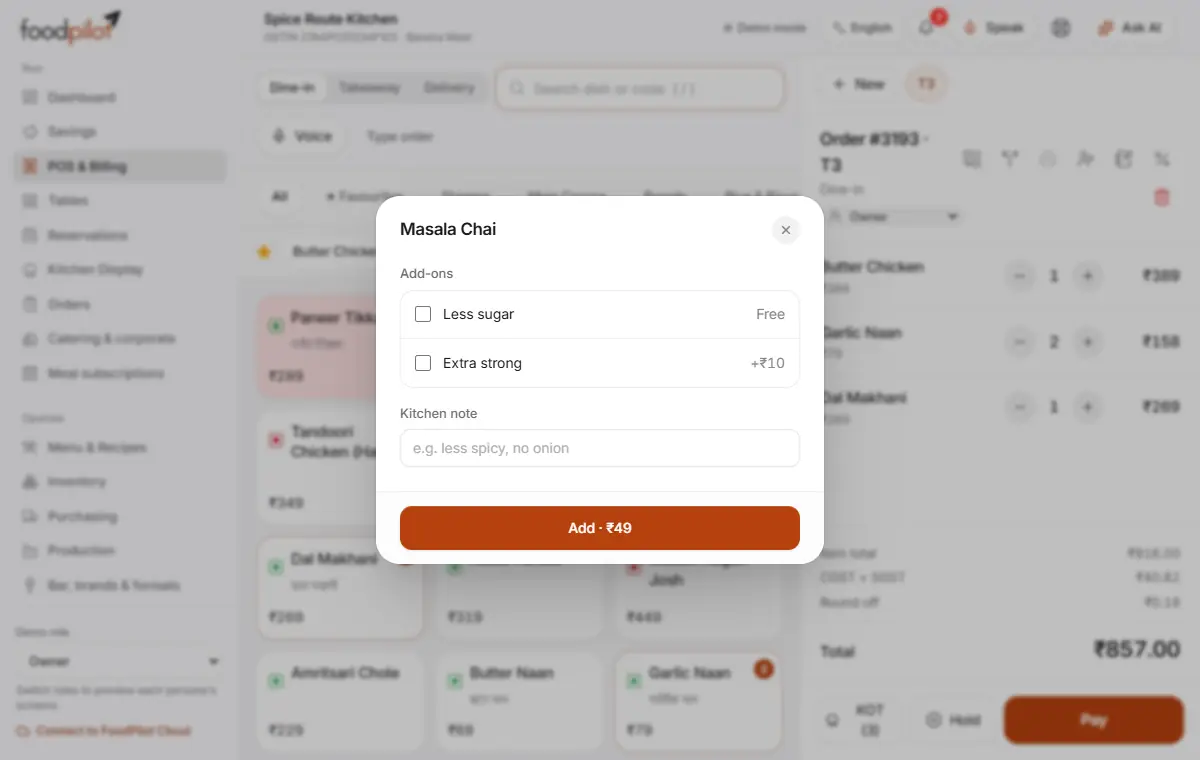
  1. Step 1: Tap a dish marked options.
  2. Step 2: Pick the Portion, for example Half or Full.
  3. Step 3: Tick the Add-ons you want. Add-ons with no price show Free.
  4. Step 4: Type a Kitchen note if needed, for example "less spicy, no onion".
  5. Step 5: Tap Add · ₹….
The add-ons sheet for Masala Chai with Less sugar, Extra strong, a kitchen note and the Add button

Take an order by voice or typing

  1. Step 1: Tap Voice next to search and say the order in English or Hinglish, for example "2 butter chicken, teen garlic naan".
  2. Step 2: Or tap Type order, type the whole order in one line and tap Add to order.
  3. Step 3: Check the items on the ticket before you send the KOT.

Repeat the last order

  1. Step 1: Start a new Takeaway or Delivery order.
  2. Step 2: On the empty ticket, tap Repeat last order. The same dishes are added.
  3. Step 3: Tap Pay, then Settle. A repeat bill takes about 3 taps.

Give a discount or use a coupon

  1. Step 1: Tap the Discount icon at the top of the ticket.
  2. Step 2: Choose Percent or Fixed ₹ and pick the amount.
  3. Step 3: Type a reason. It is saved in the audit log.
  4. Step 4: Tap Apply. Discounts above your limit (10% for cashiers and waiters) need a manager's PIN.
  5. Step 5: For a coupon, tap Pay, type the code next to Coupon and tap Apply.
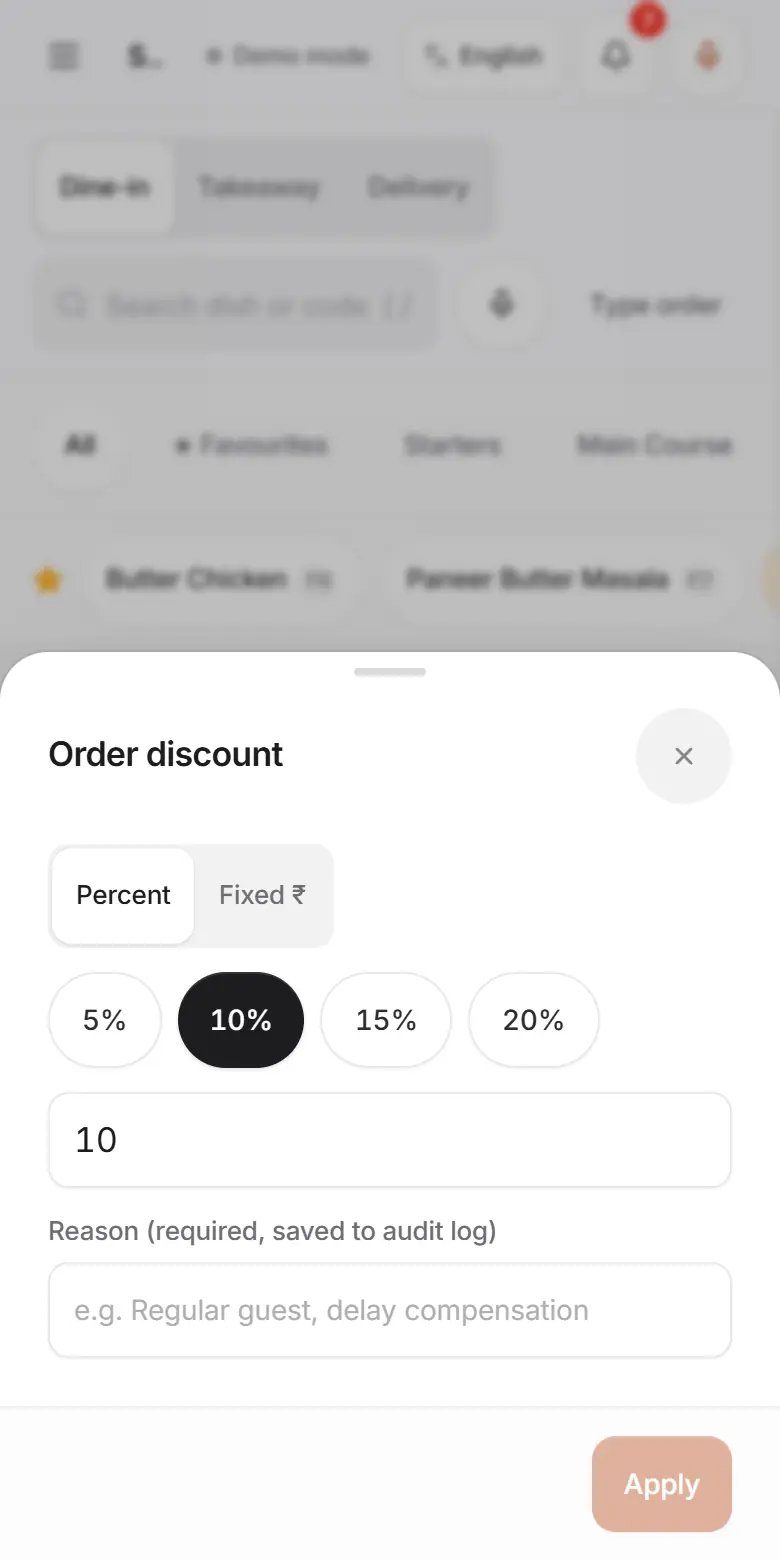
The Order discount sheet on a phone with Percent and Fixed ₹, quick amounts and a reason

Split the bill

Pay → Equal or By items

  1. Step 1: Tap Pay.
  2. Step 2: Choose Equal and set the number of guests with − and +. Or choose By items and give each line to a guest.
  3. Step 3: Take each guest's payment and tap Settle for each one.
  4. Step 4: To take part cash and part UPI, type the cash amount, tap Add, then settle the rest by UPI.

Serve dine-in in courses

  1. Step 1: Turn on Serve dine-in in courses in Settings → Courses & day close.
  2. Step 2: On the ticket, tap a line's course chip to choose Starters, Mains or Desserts.
  3. Step 3: Tap KOT. Starters go to the kitchen. Later courses are held.
  4. Step 4: When the table is ready for the next course, tap Fire (or Fire now on that course).
  5. Step 5: Or set Fire the next course by itself to send it a few minutes after the last course is ready.

Remove an item after the KOT

  1. Step 1: Tap × on the line.
  2. Step 2: Pick a reason, for example Guest changed mind or Wrong item entered.
  3. Step 3: Answer Was it cooked? with Yes, cooked or No, not cooked. Cooked food is logged as wastage.
  4. Step 4: Tap Void item. A manager enters their PIN to approve.

Cancel an order

  1. Step 1: Before the KOT: tap the bin icon (Cancel order). Made a mistake? Tap Undo within a few seconds.
  2. Step 2: After the KOT: tap the bin icon and pick a reason (Guest left, Wrong order, Kitchen delay, Duplicate order or Other). Tap Cancel order. A manager enters their PIN.

Refund a bill

Orders → open the order → Refund

  1. Step 1: Open Orders and find the bill. Search by order number, invoice, name or phone.
  2. Step 2: Tap Refund.
  3. Step 3: Choose By items or Amount and type the reason.
  4. Step 4: Tap Refund ₹…. An owner or manager approves with their PIN. FoodPilot makes a GST credit note.
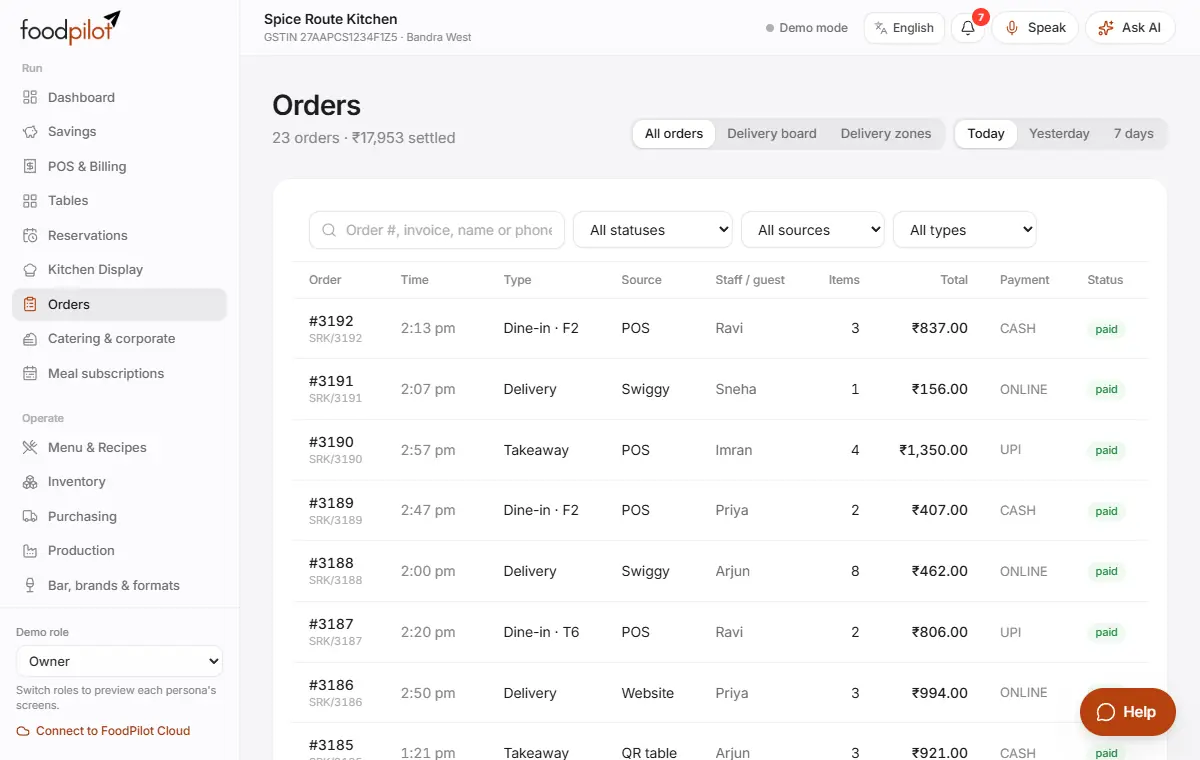
The Orders page with today's orders, search and status filters

Send an e-bill

  1. Step 1: On the invoice, tap Send e-bill.
  2. Step 2: Type the guest's mobile number and choose WhatsApp or SMS.
  3. Step 3: Tap Send. Or tap Show QR for the guest to scan, or Copy link.

Automatic WhatsApp e-bills are on the Professional plan and above. On every plan you can show the bill QR, copy the link or send it from your own phone.

Tips

  • Hold sends the KOT and starts a new order. The held order stays as a chip at the top. Tap it to go back.
  • The pay sheet remembers the last way you took payment on this device. Check the Settle button before you tap it.
  • To skip the invoice screen, turn off Show invoice after payment in Settings → Billing & approvals. You'll see a short "Paid" message with View instead.
  • Give dishes keyboard keys in Customise → POS layout for very fast counter billing.
  • Each device has its own invoice series, so two counters never make the same bill number.

Common problems

Pay is greyed out on a delivery order.
Add the delivery details and choose a delivery zone. The order must also meet the zone's minimum.
Voice says "Not on the menu".
Say the dish name again, or tap it. In a noisy room, use Type order instead.
A dish shows Sold out or Not now.
Sold out means someone turned off Available to order for that dish. Not now means it's outside its set hours. Change both in Menu & Recipes.
The manager PIN says Wrong PIN.
Check the 4-digit PIN. After 5 wrong tries it locks for a while. With no internet, the PIN is checked on this device and the owner reviews the approval later.
The bill shows the wrong type of GST.
Bills use your outlet's state from Setup → Profile & GST. Check the state and GSTIN there.

Read next

Help articles

The same articles the AI help chat uses. In the app: Help & support → Help articles.

Make a bill on the POSPOS पर बिल बनाएँRead

Take an order, send the KOT, collect payment and print or send the bill.

Make a bill

  1. Go to POS & Billing.
  2. Choose Dine-in, Takeaway or Delivery. For dine-in, pick the table.
  3. Tap dishes to add them, or use Search dish or code (press / on a keyboard). You can also type or speak the order with the mic.
  4. Tap KOT to send new items to the kitchen.
  5. Tap Pay, choose Cash, Card / UPI or another tender, and settle. You can take part cash and part UPI.
  6. Tap Print for the receipt, or Send e-bill to send the GST bill link by SMS or WhatsApp (Professional plan and above; on every plan you can show the bill QR or copy the link).

Common actions

  • Discount: apply a discount or coupon. Large discounts may need a manager PIN, depending on your approval rules.
  • Hold: park an order and come back to it.
  • Split: in the pay screen, split the bill Equal or By items.
  • Move items to another table, or merge tables, from the table actions.
  • Reprint KOT: reprints are logged in the audit trail.

Refunds and cancellations

  • Refunds are done from Orders → open the order → Refund. They need owner or manager approval and create a GST credit note.
  • Voiding an item asks for a reason, which is logged.

Service charge

  • Service charge is optional by law (CCPA guidelines). FoodPilot never adds it on its own, even if your edition suggests a rate.
  • On a dine-in bill, ask the guest. Only if they agree, tap Guest agreed to service charge. The bill then shows a separate Service charge (optional) line.
  • If the guest asks, tap Remove next to it (on the bill or in the pay screen) any time before the bill is settled.
  • Set the suggested rate, or 0 to hide the button, in Setup → Profile & GST → Suggested service charge %.

Cash of ₹2 lakh or more

  • Income-tax law doesn't allow cash of ₹2 lakh or more for one bill (split and part payments count together), for one catering event, or from one person in a day.
  • The pay screen stops cash at ₹1,99,999 for a bill and tells you to take the rest by UPI, card or bank transfer.
  • If a saved guest has already paid close to ₹2 lakh in cash today on other bills, you see a warning.

Good to know

  • Billing keeps working without internet. Bills sync when the connection returns, and each device has its own invoice series, so numbers never clash.
  • Invoice numbers look like SRK01/2627/00042: your invoice prefix (up to 3 characters), the device (01), the financial year (2026-27) and the bill number, which restarts every 1 April. GST allows at most 16 characters, and FoodPilot never goes over. Credit notes look like SRK01/2627/C0001.
  • The bill shows CGST + SGST or IGST based on the GST state set in Setup → Profile & GST.
Offline mode and syncऑफ़लाइन मोड और सिंकRead

FoodPilot keeps billing without internet and syncs every change when the connection returns.

What works offline

  • Billing, KOTs, tables and settling bills keep working. Every change is saved on the device and queued.
  • Each device has its own invoice series, so bills made offline never get duplicate numbers.
  • When the internet returns, queued changes sync in order. Retries never create duplicate bills.

The sync status at the top

  • Synced or Live: everything is up to date. Live means changes from other devices appear instantly.
  • Syncing N: N changes are being sent.
  • Offline · N queued: no internet; N changes are waiting. Keep billing.
  • Retrying · N queued: the server didn't answer; FoodPilot keeps trying.
  • Session expired · log in: tap it and sign in again. Queued changes are kept.
  • Read-only or Account closed: the account isn't active. Open Billing & plan.

What needs internet

Card machine and auto-confirm UPI payments, sending e-bills, online and QR orders, AI features and this help chat.

If something isn't syncing

  1. Check the device's internet, then wait a minute: sync retries by itself.
  2. Open Settings → Devices & sync to see Queued events. Under FoodPilot Cloud, any changes the server refused are listed, usually because of a permission rule.
  3. Don't sign out and don't clear the browser's data while changes are queued. FoodPilot warns you before signing out with unsynced changes, because they would be lost.
  4. If another device doesn't show a change, check that device is online too.

If changes stay queued for a long time while the internet works, raise a ticket with the device number shown in Settings → FoodPilot Cloud.

Open in Help →
UPI and card paymentsUPI और कार्ड से पेमेंटRead

The ways FoodPilot can take UPI and card payments at the counter, and where to set them up.

UPI: two options

  • UPI with your own UPI ID: the customer scans a QR showing your UPI ID, and the cashier checks the money has arrived before settling. No payment gateway needed. Add your UPI ID in Devices & printers → Devices, either on the receipt printer or in the Customer display card.
  • UPI QR (auto): a one-time QR for the exact amount that closes the bill by itself when the customer pays. It needs your Razorpay account connected in Devices & printers → Payments → Payment providers. Without a gateway, this QR uses your UPI ID and you confirm receipt yourself.

Card machines

  1. Go to Devices & printers → Payments → Add card machine.
  2. Choose the provider, give it a name and tap Save.
  3. The owner enters the provider's credentials under Payment providers. They are stored encrypted on the server, never on the device.

What works today:

  • The simulator (demo card machine) works for testing and training.
  • Pine Labs, Paytm card machine (EDC) and Razorpay POS need your own merchant account with that provider, and have not yet been tested against live accounts.
  • Mswipe has no direct link yet: charge on the machine and record the payment as Card.

Taking the payment

On POS & Billing, tap Pay. Choose Card machine and tap Charge on card machine, or choose UPI QR (auto) and tap Show UPI QR. The QR also appears on the customer display. When the money arrives, the bill shows Payment received.

Customer display

In Devices & printers, tap Open customer display and drag the window to a second screen (F11 for full screen). It shows the live bill, GST totals and the UPI QR for the exact amount.

Good to know

Connecting a real provider needs a FoodPilot Cloud sign-in, and card machine and auto-confirm UPI payments need internet.