
Guests 4 min read

Table QR: order and pay

टेबल QR: ऑर्डर और भुगतान

Guests scan a QR on the table to see the menu, order, call a waiter and pay from their phone.

मेहमान टेबल पर QR स्कैन करके मेन्यू देखें, ऑर्डर करें, वेटर बुलाएँ और फ़ोन से भुगतान करें।

Updated

Whole guide as PDF

What it does

Each table has its own QR code. Guests scan it with their phone camera. No app needed.

They see the menu in English or Hindi, order more rounds, call a waiter and ask for the bill.

They can pay from their phone, split the bill and add a tip. The money goes straight to your own UPI or payment account.

Who uses it
GuestCaptainCashierManager
Which plan
Growth and above
Where to find it
Tables → tap a table → Open guest QR menu
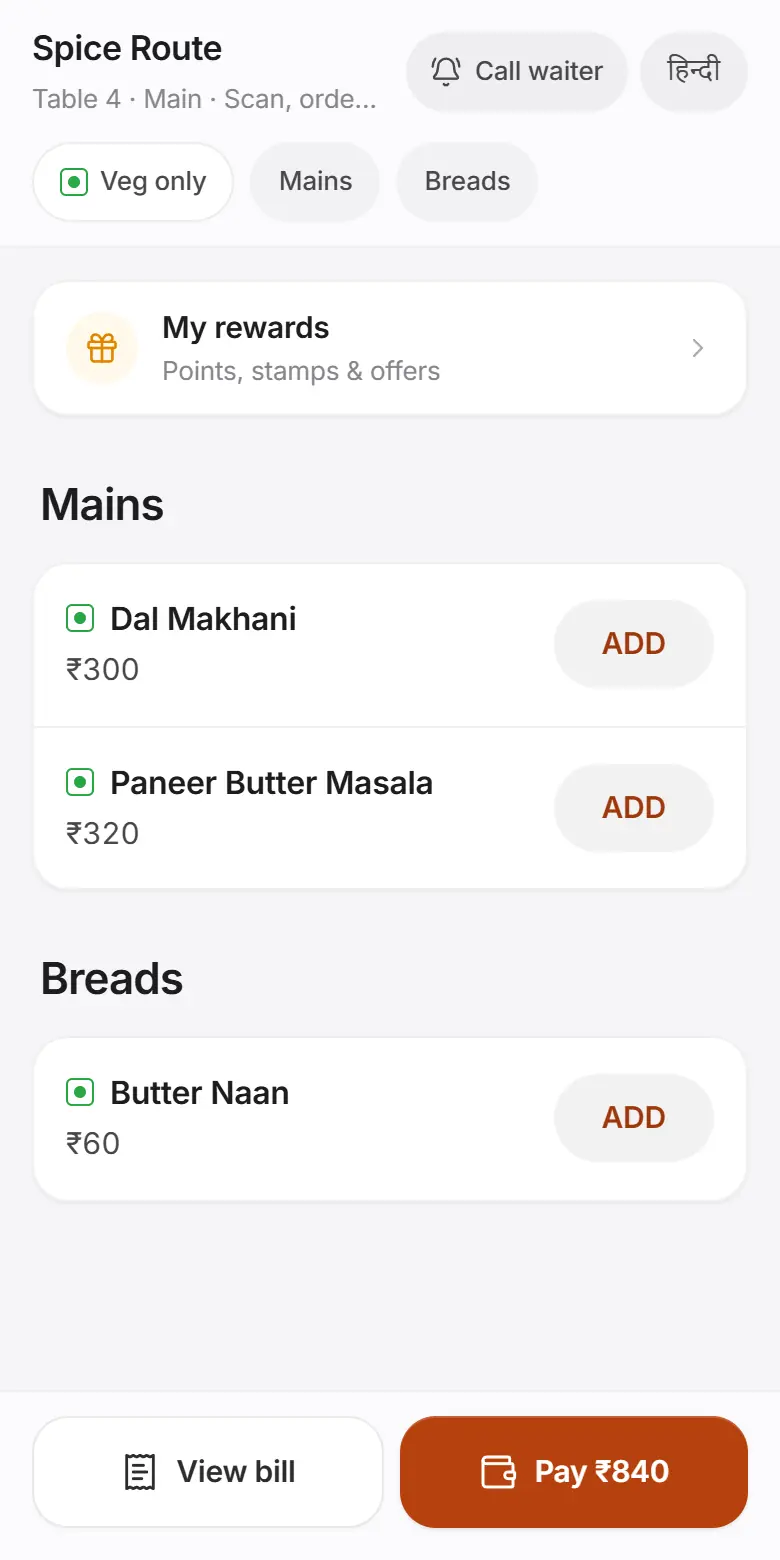
The guest's table QR menu on a phone with Call waiter, dishes and the order button

How to

Get a table's QR code

Tables → tap a table → Open guest QR menu

  1. Step 1: Add your tables in Setup → Tables & floor.
  2. Step 2: Open Tables, tap the table and tap Open guest QR menu for …. This opens that table's own ordering page.
  3. Step 3: Print that page's address as a QR code and put it on the table.

Each QR carries a key for its table, so one table can never see another table's bill.

What the guest does

  1. Step 1: Scans the QR on the table.
  2. Step 2: Taps ADD on dishes, then Place order. Can switch to हिन्दी or tap Veg only. Nothing is paid yet.
  3. Step 3: With Need staff approval (new restaurants), the guest sees Waiting for staff to confirm until the cashier or the table's waiter approves it. With Send straight to kitchen, it reaches the POS (marked QR) and the kitchen at once.
  4. Step 4: Taps Order more for the next round (each round is approved the same way), Call waiter, or Ask for bill and chooses UPI on my phone, Card — bring the card machine or Cash.

Approve QR orders

Devices & printers → Payments → Table QR: orders, bill & pay → Table QR orders

  1. Step 1: Choose Need staff approval or Send straight to kitchen under Table QR orders.
  2. Step 2: A new QR order chimes, shows N QR orders to approve and puts Waiting for approval on the table. The cashier and the table's waiter also get a phone alert.
  3. Step 3: Tap it. Approve sends it to the kitchen like Send KOT. Edit changes quantities or removes items first. Reject asks for a reason the guest sees.
  4. Step 4: The cashier, a manager or the owner can approve any table; a waiter only the tables they serve.

Approving needs the internet. If your devices are offline the guest keeps seeing Waiting for staff to confirm, and the kitchen never gets the order twice.

Let guests pay from their phone

Devices & printers → Payments → Table QR: orders, bill & pay

  1. Step 1: Go to Devices & printers → Payments.
  2. Step 2: Connect Razorpay, or save your UPI ID on the receipt printer.
  3. Step 3: In Table QR: orders, bill & pay, turn on Guests can view bill and Guests can pay from phone. Choose whether to allow split bills, tips and more rounds.
  4. Step 4: Guests tap Pay ₹…, choose Pay full balance, Split equally or Pay a custom amount, add a tip if they like, and pay in their UPI app.
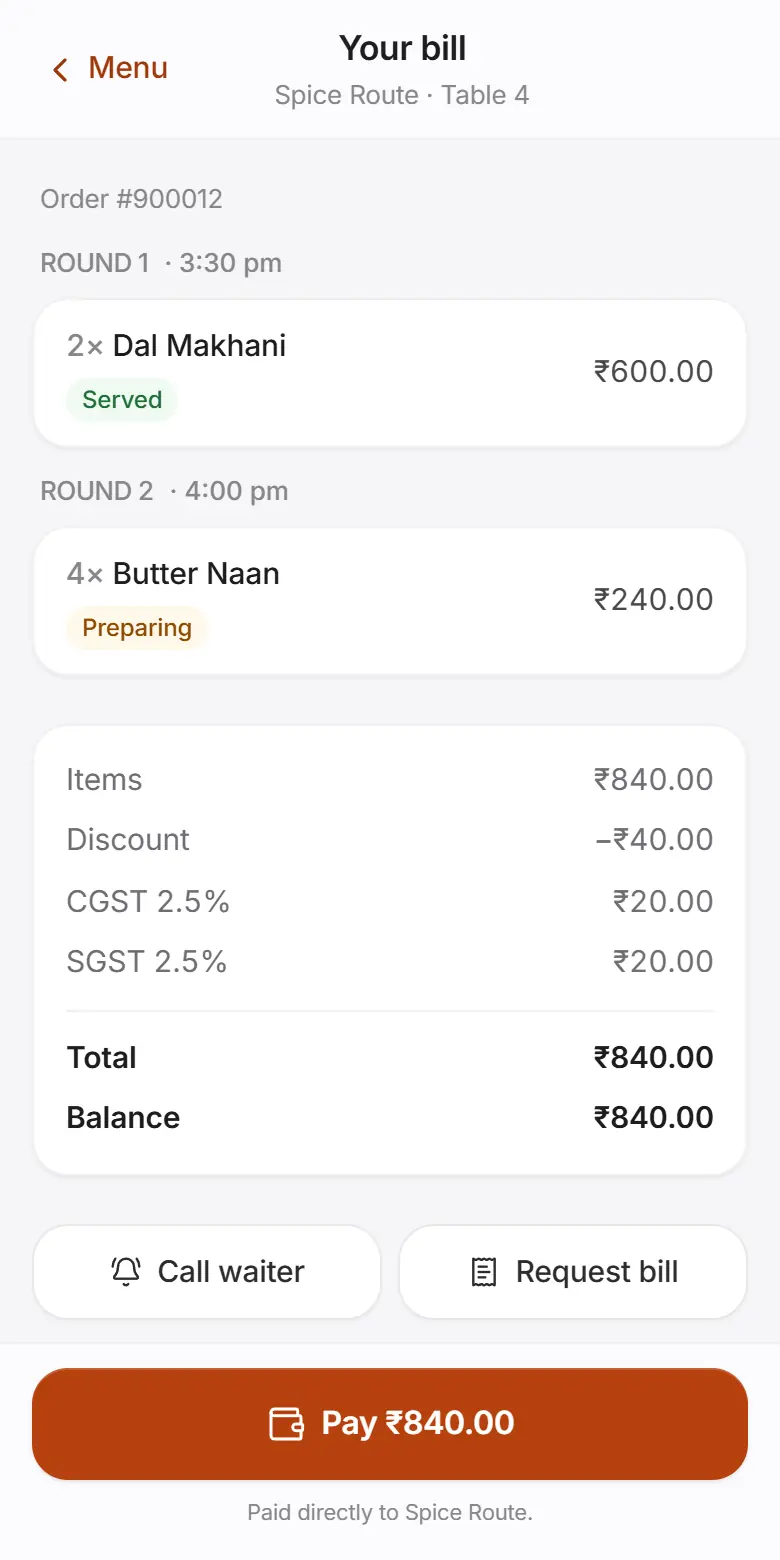
The guest's running bill on a phone, by round, with GST and the balance to pay

Confirm a guest's UPI payment

  1. Step 1: With only a UPI ID (no Razorpay), the guest taps I've paid after paying.
  2. Step 2: Staff see it in the guest requests tray. Check your bank or UPI app, then tap Confirm received, or Reject.
  3. Step 3: With Razorpay connected, payments confirm by themselves.

Answer a waiter call

  1. Step 1: When a guest taps Call waiter or Ask for bill, it shows in the guest requests tray, with how they want to pay (for example Wants the bill — card machine).
  2. Step 2: Tap On my way so the guest knows someone is coming.

Tips

  • Prices always come from FoodPilot, never from the guest's phone.
  • After paying, guests can get the GST e-bill on their phone.
  • Turning off a dish in Menu & Recipes hides it from table QR menus at once.

Common problems

Guests can't see the Pay button.
Turn on Guests can pay from phone, and connect Razorpay or set a UPI ID on the receipt printer. Older printed QR codes still take orders but don't show the bill or Pay. Print the new QR.
A guest says they paid but the bill is still open.
With only a UPI ID, staff must check the bank and tap Confirm received. With Razorpay, wait a moment for the payment to arrive.
QR ordering doesn't work in the demo.
The guest page needs FoodPilot Cloud and internet. The offline demo shows the menu and Place order only.

Coming soon

  • Group ordering from each guest's phone
  • Menus in more languages

Read next

Help articles

The same articles the AI help chat uses. In the app: Help & support → Help articles.

Online store and QR table orderingऑनलाइन स्टोर और QR ऑर्डरिंगRead

How guests order from your own online store, or by scanning a QR code at their table.

QR ordering at the table

  1. Add your tables in Setup → Tables & floor.
  2. Go to Tables, tap a table and tap Open guest QR menu for that table. This opens the table's own ordering page. Share or print that page's address as the QR code for the table.
  3. Guests see the menu with GST included and tap Place order. Nothing is paid at this point.
  4. What happens next depends on Table QR orders in Devices & printers → Payments → Table QR: orders, bill & pay:
    • Need staff approval (the default for new restaurants): the order waits for the cashier or the waiter serving that table. The guest sees "Waiting for staff to confirm". Nothing reaches the kitchen or the bill until a staff member approves it.
    • Send straight to kitchen: the order goes to the kitchen at once and the guest sees "Order sent to the kitchen!". Restaurants that used QR ordering before this setting keep this until they change it.

Approving QR orders

  1. A new QR order chimes on the POS and tables screens, shows N QR orders to approve, and puts a Waiting for approval badge on the table. The cashier, manager, owner and the table's waiter (all waiters if the table has none) also get a phone alert.
  2. Tap it to open the list. For each order:
    • Approve sends it to the kitchen like Send KOT: the KOT prints on the device that approved it and the Kitchen Display shows it.
    • Edit lets you change quantities or remove an item, then Approve changes.
    • Reject asks for a reason, such as "Item not available right now". The guest sees "Not accepted" with your reason.
  3. Who can approve: the cashier, a manager or the owner for any table, and the waiter serving that table (the bill's waiter, else the table's or section's waiter in Tables). Other waiters see the order but can't approve it.
  4. Guests can order more rounds while the table's bill is open. Each round needs approval the same way, and the guest always sees the running total of what was confirmed.
  5. Every approval, edit and rejection is in the Audit log with the name of the person who did it.
  6. Approving needs the internet. If your devices are offline, the order waits and the guest keeps seeing "Waiting for staff to confirm" until you are back online. The kitchen never gets it twice.

When the guest asks for the bill

The guest can pay from their phone (when UPI or Razorpay is set up), or tap Ask for bill and choose UPI on my phone, Card — bring the card machine or Cash. You see it as, for example, "Table 4 wants the bill — card machine".

Your online store

  1. Open your store from Orders → Delivery board → Online store, or Customise → Branding & store → Open online store.
  2. Guests choose Pickup or Delivery, enter their name and phone, and place the order. They then see a status page that updates by itself as the order is prepared and ready.
  3. Store colours and logo are set in Customise → Branding & store.

Delivery zones and fees

Go to Orders → Delivery zones → Add zone. Set the name, radius (km), ETA, fee, minimum order and optional pincodes, and tick Accepting orders. Fees and minimums are checked by FoodPilot when the order is placed. With no zones, the store offers pickup only.

Handling online orders

Online orders appear in Orders and on the Delivery board, and reach the kitchen like any other order.

Good to know

  • Your real store and table links work once you're signed in to FoodPilot Cloud; the restaurant's devices need internet to receive these orders.
  • Swiggy, Zomato and ONDC order sync isn't available yet. It needs partner approval from those platforms.
UPI or card payment not confirmingUPI पेमेंट कन्फ़र्म नहीं हो रहाRead

What to do when a UPI or card payment doesn't mark the bill as paid.

First, check which UPI you used

  • UPI (your own UPI ID) never confirms by itself. Check the money has arrived in your UPI app, then add the amount and tap Settle.
  • UPI QR (auto) without a payment gateway also needs you: when the money shows in your UPI app, tap Payment received (you can add the UPI ref / UTR).
  • UPI QR (auto) with Razorpay connected confirms by itself once the payment reaches FoodPilot.

If the auto QR doesn't confirm

  1. Read the message on screen. "Waiting for the customer to scan and pay…" means FoodPilot hasn't received the payment yet.
  2. Ask the customer to show the success screen in their UPI app, and check your Razorpay account.
  3. Check this device's internet. The status at the top of the screen should not say Offline.
  4. A QR expires after 10 minutes ("The QR expired before payment. Generate a new one."). Tap Cancel payment, then Show UPI QR again.
  5. Don't ask the customer to pay twice. If the money has clearly arrived but the bill hasn't updated, open the order in Orders to see whether the payment was already added before recording it again with the UPI method.

Card machine timeouts

A card prompt expires after 3 minutes ("The card machine timed out. Try again."). Check the machine is on and connected, then charge again. If the machine printed an approved slip but FoodPilot shows a failure, don't charge again: check Orders first.

Closing the payment window

If you close Collect payment after a card or UPI payment was received, FoodPilot warns you before closing. Reopen the order to settle the rest.

If it still doesn't work

Raise a ticket in Help & support with the order number, amount, time, payment method and UPI reference.

UPI and card paymentsUPI और कार्ड से पेमेंटRead

The ways FoodPilot can take UPI and card payments at the counter, and where to set them up.

UPI: two options

  • UPI with your own UPI ID: the customer scans a QR showing your UPI ID, and the cashier checks the money has arrived before settling. No payment gateway needed. Add your UPI ID in Devices & printers → Devices, either on the receipt printer or in the Customer display card.
  • UPI QR (auto): a one-time QR for the exact amount that closes the bill by itself when the customer pays. It needs your Razorpay account connected in Devices & printers → Payments → Payment providers. Without a gateway, this QR uses your UPI ID and you confirm receipt yourself.

Card machines

  1. Go to Devices & printers → Payments → Add card machine.
  2. Choose the provider, give it a name and tap Save.
  3. The owner enters the provider's credentials under Payment providers. They are stored encrypted on the server, never on the device.

What works today:

  • The simulator (demo card machine) works for testing and training.
  • Pine Labs, Paytm card machine (EDC) and Razorpay POS need your own merchant account with that provider, and have not yet been tested against live accounts.
  • Mswipe has no direct link yet: charge on the machine and record the payment as Card.

Taking the payment

On POS & Billing, tap Pay. Choose Card machine and tap Charge on card machine, or choose UPI QR (auto) and tap Show UPI QR. The QR also appears on the customer display. When the money arrives, the bill shows Payment received.

Customer display

In Devices & printers, tap Open customer display and drag the window to a second screen (F11 for full screen). It shows the live bill, GST totals and the UPI QR for the exact amount.

Good to know

Connecting a real provider needs a FoodPilot Cloud sign-in, and card machine and auto-confirm UPI payments need internet.